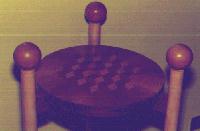
 This project tests your skills as an inlayer. The reason is: the three shelves of this light round table shelf are inlaid with geometrical patterns as described in the page Geometrical Veneer Inlays. This table shelf was designed by my wife Karen, who was inspired by the work of Jean-Michel Frank.
Of course the inlay of these shelves is not compulsory. You can elect just to glue a single sheet of veneer (as anyway done for the lower surface of the shelves). The shelves are hollow inside, to keep them, and the all piece, as light as possible. The round chassis was built with the brick laying technique. Also part of the construction can be simplified using shelves made of solid wood (like multilayer plywood or, sigh, MDF).
The following is the list of the tools you'll need (in parenthesis the power tools alternatives):
Other materials needed include fine sand paper (150), steel wool, shellac and 8 mm dowels. The cutting list is as follows.
| Quantity | Dimensions | Name | Material |
|---|---|---|---|
| For the shelves | |||
| 6 | 36 x 36 | Upper and lower shelf faces | Poplar plywood, 4 mm |
| 3 (6) | 35 x 35 | Upper and lower shelf faces | Mahogany veneer |
| 3 | 3 x 10⁷ | Strips for shelf sides | Mahogany veneer |
| 48 | 6 x 15 | Segments for round chassis | 10 mm think pine board |
| For the legs | |||
| 1 | 10 x 42 | For the 9 shelf supports | 18/20 mm think Mansonia |
| 3 | 100 | Legs | Samba (also known as Obeche) round rod, 3.5 cm diameter |
| 3 | 6 | End balls | Up to 6 cm diameter |
The description of the construction of the table shelf is divided in the description of the construction of the shelves, of their supports and of the legs, including assembly. We'll finally talk about the finishing. Since most of these operation have a simpler alternative, at the end of each paragraph you'll find the list of the possible simplifications (although the table shelf becomes heavier and looses its grace with the increasing number of such simplifications).
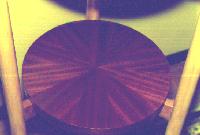
The three shelves are built as if they were drums. Such drums are built on a round chassis, built with the brick laying technique. To build the chassis, you'll need to prepare two rings made of 10 mm thick pine, as in the picture on the side. Each ring is made of 8 segments, and the two overlapping rings are rotated over each other at 22.5°, to strengthen the otherwise weak butt joints. To cut the pattern that you'll be using to draw the segments, you can use the formulas on the page Computation of the segments of a circular corona. 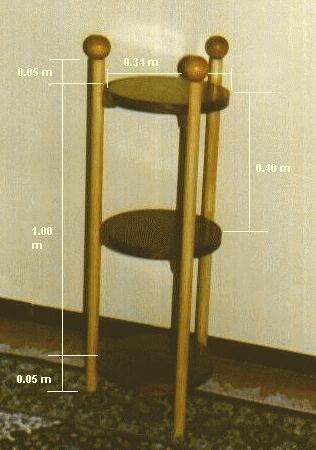 We'll use an external diameter of 18 cm and an internal one of 13 cm, so to obtain shelves with a (theoretical) diameter of 36 cm.
After the glue has set and the dimensions are carefully checked, we'll glue one of the plywood sheets that form the faces of the drum and the surfaces of the shelves. Once the glue is set, we'll prepare plywood strips 2 cm wide, 26 cm long (equal to the internal diameter of the round chassis), and make the half cuts in the middle of them, so to cross them as shown in the picture. These strips of plywood are needed to avoid that the shelf surface would buckle under heavy loads (like, for instance, a vase with flowers filled with water). After this you'll glue the other sheet of plywood, for the second shelf surface.
When the glue has set, route down the shelf to a diameter of 34 cm, in order to obtain a perfect circle. After routing, the internal chassis will be 4 cm wide and 2 cm thick, more than adequate to hold a shelf of this size. The thickness of the completed shelf results of 28 mm, but the veneer will add another 2 mm.
Simplifications
Should you want to simplify the construction of the shelves, you can just cut 2 round boards of multilayer plywood or MDF. If you use multilayer plywood, should you not find panels 30 mm thick, you can glue two squares 15 mm thick, 35 cm on the side. Than cut them in a circular shape of a diameter slightly wider than 34 cm, that can be refined later with rotary sander or file. The MDF is normally available in panels 28 or 30 mm thick, so you can avoid gluing two panels 15 mm thick. The rest of the procedure is identical.
The proposed veneering scheme for this table shelf is as follows:
 |
|
 |
|
Simplifications
You can cover the top faces of all three shelves with a simple veneer of mahogany, just like it is done for the lower faces.
To assemble the shelves with the legs of the table shelf, we'll use some purposely made supports. They will keep the legs at a distance from the shelves, helping in providing lightness to the design. For the supports  we'll use a piece of board 20 mm thick and 10 cm wide. We suggest you use Mansonia, but the essence can be changed. But keep in mind that, given the relatively high mechanical stress of these supports, and their light design, it's appropriate to use an essence with dense fibers.
The supports are made drilling 60 mm holes with a diameter saw drill. The first hole is drilled 7 cm from the reference side of the board. The following ones are 14 cm apart from the preceding one. All the holes are aligned along the mid line of the board, following the grain. After the drilling, we'll cut the board along the middle line, than sequentially with a 7 cm step from the reference side.
To properly house the shelf, we'll finally cut on each support a dent 3 cm long and 1 cm deep, as in the figure on the side.
 The assembly is carried out using dowels as joints between the supports and either the shelves and the legs of the table shelf. The end balls on top of the legs will also be jointed using dowels. First of all, though, we need to make small flattened areas at the point of junction of supports to the legs. This is usually done with the help of a flat chisel. The dowels are applied to the supports as indicated, and jointed to the shelves using one hole per support on the lower face of the shelf. Each shelf will have 3 holes along it's periphery, at 120° from each other.
The finishing used is shellac applied with a brush. The shellac should be around 30% dense. Between one coat and the next one we'll pass lightly with 150 grain sand paper. Assume to apply about 10 coats, typically using a total work time of about 2 hours, spread in a day an a half. The result is in a discrete shininess, definitively not like polyurethan resin.
Back to the top Version 1.0 - February 14, 1999
Note